If your driveway has cracks or potholes, it may be time to repair or replace it. With proper maintenance, your driveway can last for decades. For professional assistance, reach out to specialists in driveway repair Nashville.
Addressing damage promptly prevents major repairs and saves you money in the long run. Whether you have a paver, asphalt, or gravel driveway, here are the steps to repair it: 1. Preparation.
Preparation
The success of concrete driveway repair depends on adequate preparation, which entails thoroughly cleaning and properly priming the damaged surface. Professional contractors typically use power blowers and wire brooms to remove dirt, debris, oil stains, and vegetation from the surface. In many cases, these prep steps account for 60-70% of the project’s total time and determine 90% of the final results. Neglecting to thoroughly inspect and prepare the surface of your driveway will result in subpar repairs, recurring issues, and increased long-term maintenance costs.
Proper preparation also entails selecting and using repair materials that are appropriate for your particular concrete type. It is important to follow the product instructions carefully, as using the wrong repair material could compromise the integrity and longevity of the new surface. In addition, it is crucial to avoid undertaking repairs during periods of extreme weather or moisture, as these conditions can impact the curing process and reduce the durability of your repaired concrete.
Depending on the extent of damage, your concrete contractor may choose to use a crack filler or patching compound that is specifically designed for asphalt or concrete. For minor surface cracks, a simple asphalt sealant may be sufficient to repair the area. However, for larger areas of deterioration or sunken sections that have caused the surface to sink, a concrete repair kit is usually required to fill and seal the area. This kit typically includes a concrete mix, a bucket for mixing, a wheelbarrow, and a shovel for transporting the concrete mix to the damaged area. Once the crack or hole has been filled, it is necessary to tamp or plate compact the area to ensure that the new concrete mix is properly leveled.
Drainage improvements are often incorporated into the initial repair project to address underlying causes of long-term deterioration like water infiltration and erosion of base materials. These solutions could include regrading the driveway to promote proper water flow, installing channel drains across the driveway surface, adding French drains alongside the driveway, or creating swales to direct water runoff away from the property.
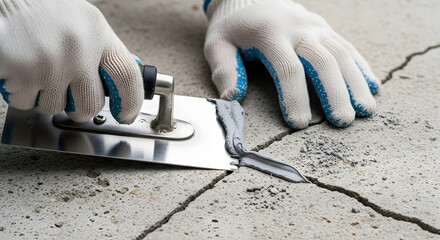
Patching
Asphalt driveways and parking lots are fairly durable, but over time they will start to show signs of wear and tear. The weather, sunlight, motor oil, and heavy foot or vehicular traffic can all take a toll on this type of pavement. When this happens, the proper repair methods will be necessary to restore the look and function of your driveway or parking lot. This can be accomplished through patching, resurfacing, or replacing the whole slab.
Before any repair is performed, the affected area should be thoroughly cleaned to ensure that the repair materials will bond properly with the existing surface. This will also prevent the problem from recurring after the repairs are complete. In addition, the cracks should be filled with a concrete crack filler or patching compound designed for your specific material and followed by the manufacturer’s instructions.
The best concrete patching method depends on the severity of the damage and your budget. If you have a small crack, you can use a concrete patching kit that includes everything needed to do the job. For larger holes, you can use a concrete repair mix that is mixed with water. A chisel can be used to remove loose or damaged areas of the surface, and a trowel can be applied to smooth and level the repaired area.
Surface “skin” patching is another option for minor defects, such as low areas or depressions. This is an ideal solution for asphalt that is deteriorating, but hasn’t completely failed yet. However, it is not recommended for potholes or major breaks in the surface. If your asphalt has severe rutting, delamination, or other more serious problems, you’ll need to dig out the damaged section of your driveway and replace it with new asphalt. This is a more involved, longer-term repair process but will give you a much more attractive, functional, and long-lasting driveway than patching alone. If you want to save money and get your concrete driveway looking great again, consider hiring a professional to perform resurfacing or replacement work. They will know the right repair techniques to use for your concrete driveway and can answer any questions you might have along the way.
Sealing
Once the patching phase is complete and any sunken areas have been raised, the final step in concrete driveway repair is to seal. This will protect the driveway from water damage and UV rays, extend its lifespan, and help keep it looking good. It’s important to use a high-quality professional asphalt sealant to get the best results.
Once again, this will take a bit of time as the sealant needs to cure and dry properly before it can be driven on. But, it’s an important step that will pay off in the long run.
It’s important to patch cracks and potholes before they become too wide or deep. Doing so will prevent the ground underneath from further eroding, which can cause structural problems for your home and/or garage. It’s also a good idea to address any drainage issues in or around your driveway so that water doesn’t pool there and cause further damage.
Before applying a sealant, it’s important to make sure that the area is completely clean. If you have any remaining debris from the patching or crack filling process, it will need to be removed before applying a sealant.
For smaller cracks, you can use rubberized asphalt-emulsion crack filler to fill them. For larger cracks or potholes, you’ll need to chisel out the damaged area and then apply a layer of concrete mix. Once again, you’ll need to use a tamper or 4×4 wooden post to compact the mixture and ensure that it is level with the existing surface.
It’s important to reseal your driveway periodically, ideally every three to five years. This will protect the concrete from water damage and UV rays, which can cause it to crack and fade. It’s important to use a quality sealant so that it lasts as long as possible.
Compaction
During this phase, the excavated area is spread with base material and compacted to ensure a solid foundation. This step is essential to preventing future problems, such as shifts and settling. Gravel or crushed stone is commonly used for the base layer and is typically spread to a depth of 4 to 6 inches. The material is then compacted using a plate compactor to firmly press it, ensuring a solid and stable surface. This step generally takes 1 to 2 days and is a vital component in ensuring that the concrete will set correctly and last long.
In addition to ensuring adequate base compaction, workers also take multiple quality control steps during this phase. For example, they often check the moisture content of the gravel to ensure it is properly damp for proper compaction (too dry and it won’t compact; too wet and it won’t bind). They may also use nuclear density gauges or core samples to test the density of the base layer and identify areas that need further work.
Once the base is complete, cracks and holes are filled with concrete mix and smoothed using a trowel. If necessary, weeds and other unwanted vegetation can be pulled by hand or with a power broom before the filler is applied. A high-quality concrete sealant is then applied to protect the repair and enhance durability.
The final step is to allow the repaired sections to cure, which usually requires about 5 to 10 days. Careful monitoring during this time is crucial, as harsh weather conditions can impact curing. This is why it’s important to choose quality concrete repair products and follow the manufacturer’s instructions for best results.